How to Choose the Best Software for Print Design
We walk you through the pros and cons of the best software to prepare your artwork and layouts for offset printing.

How to Create A Print Ready File
Whichever application or combination of applications you use to design your covers and interiors, we’ll need you to export the final files as PDFs. This is straightforward in all design software as it is standard practice when collaborating with an offset printer. So, here’s a quick guide to how to export your files as PDFs from each of the applications we’ve discussed above.



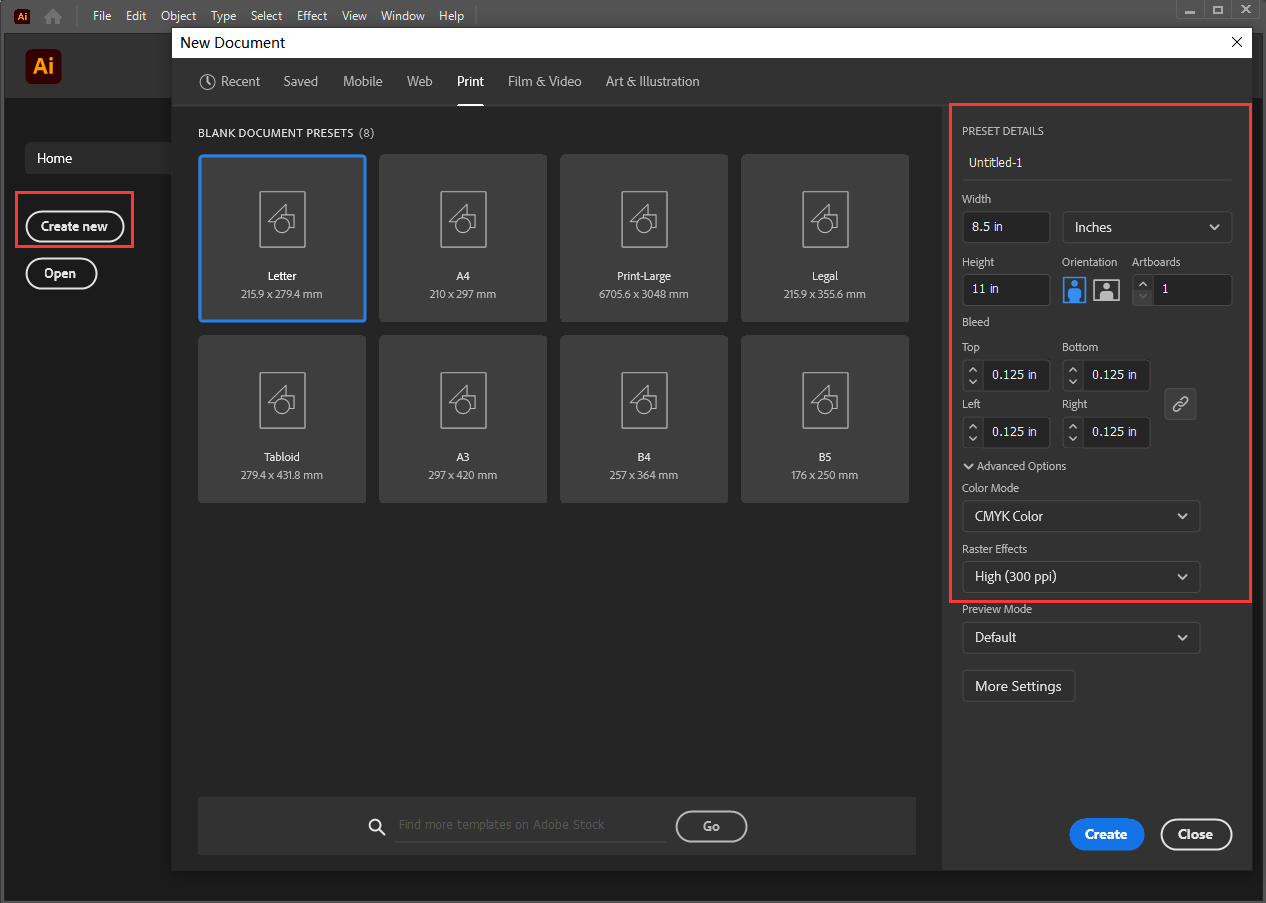
1. Open Adobe Illustrator, click on “Create New”, input your desired finished size, and select the correct units. Set the bleed to 0.125″ or 3mm. Choose CMYK colour mode and set raster effects to “High (300dpi)”.
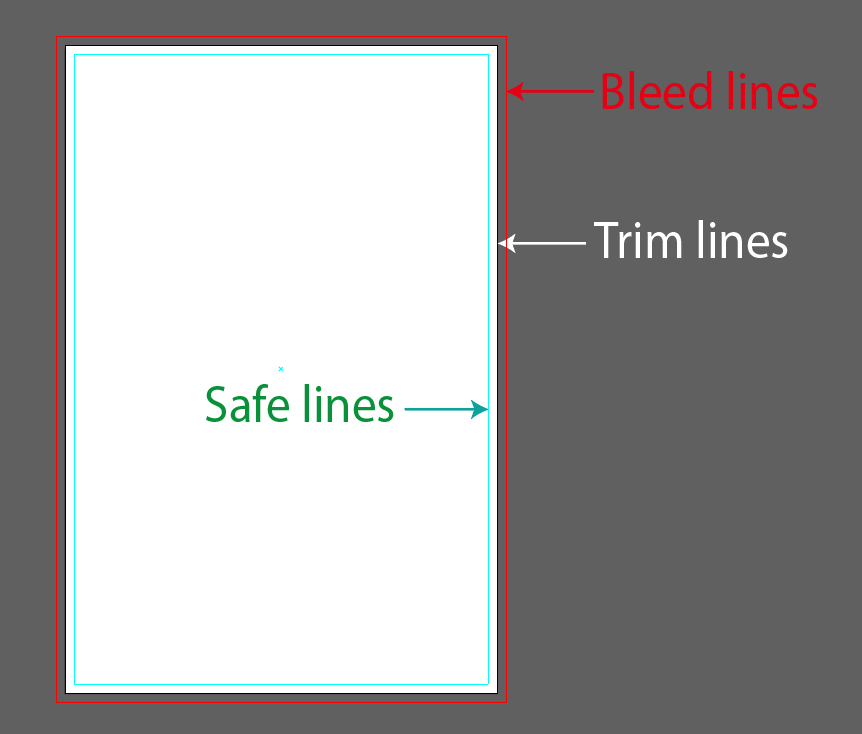
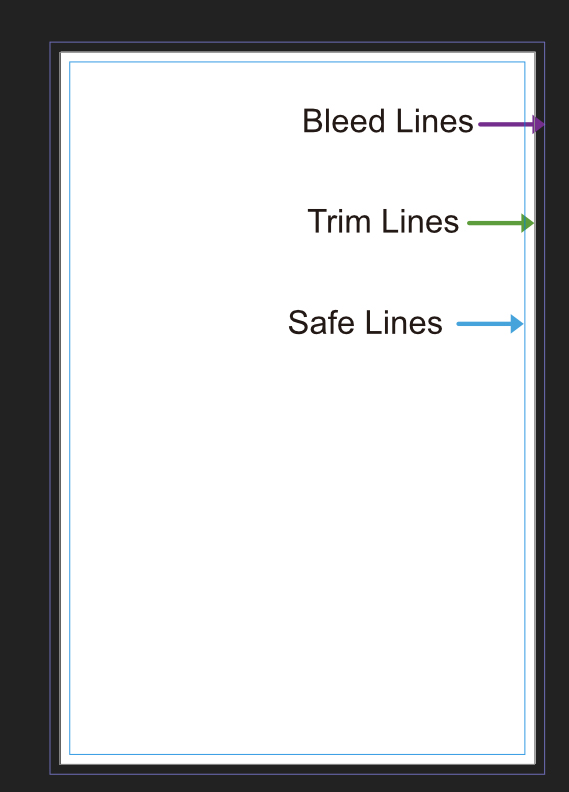
2. In the newly created document, the white area represents the finished part, while the red lines indicate the bleed area. It is recommended to place guide lines at least 0.125 inches or 3mm away from the trim line to indicate a safe area.
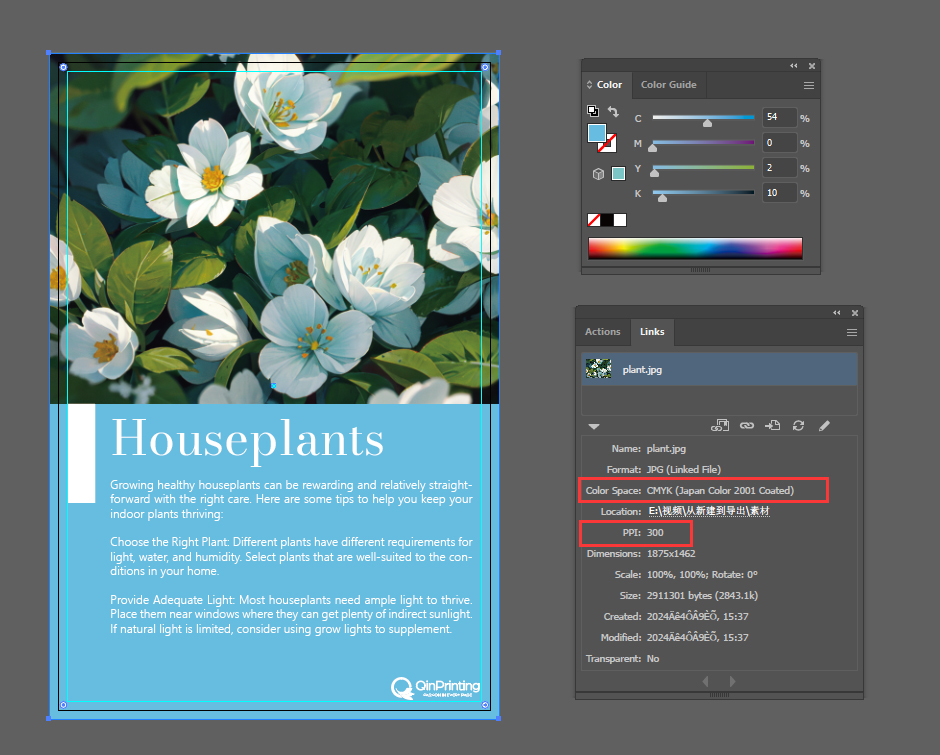
3. When starting your design, make sure to use CMYK color. Ensure that all your images are in CMYK mode and have a resolution of 300 dpi.
4. Extend the background to the bleed area and ensure that important content and text are within the safe area.
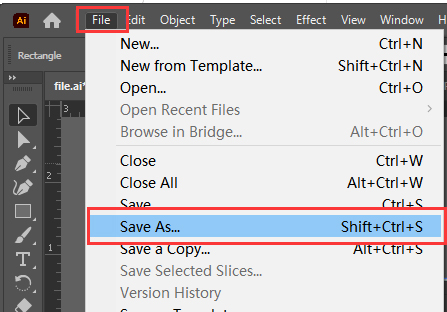
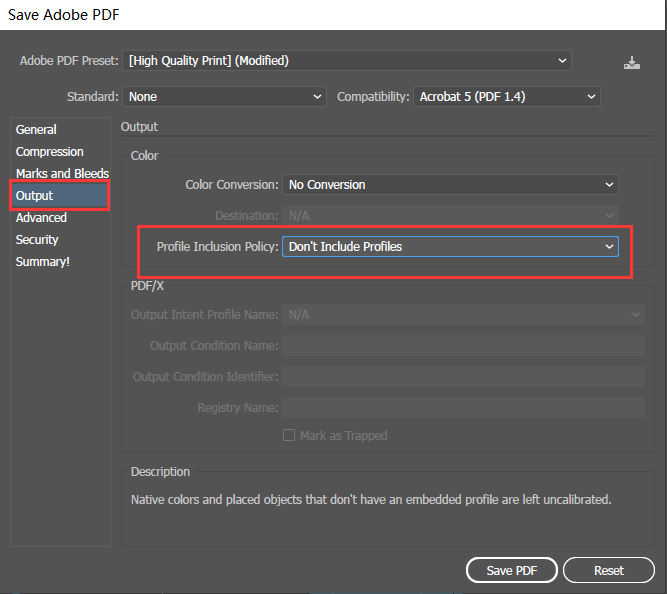
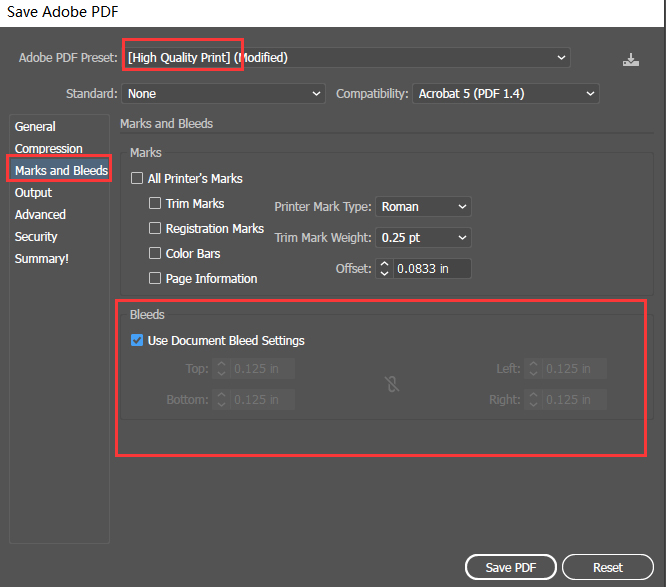
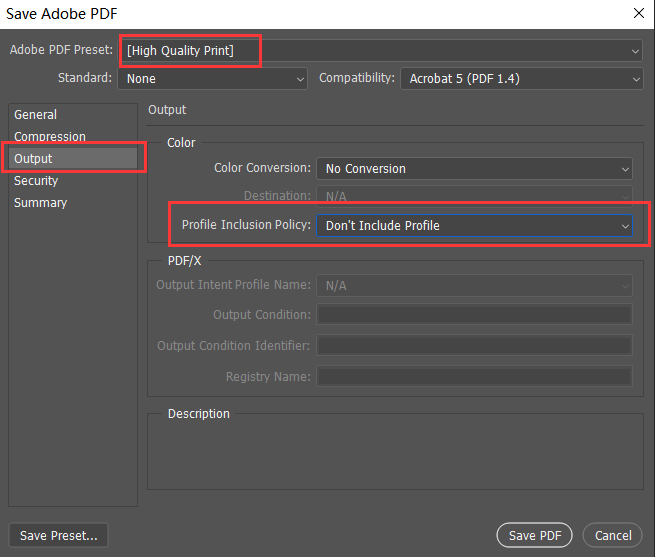
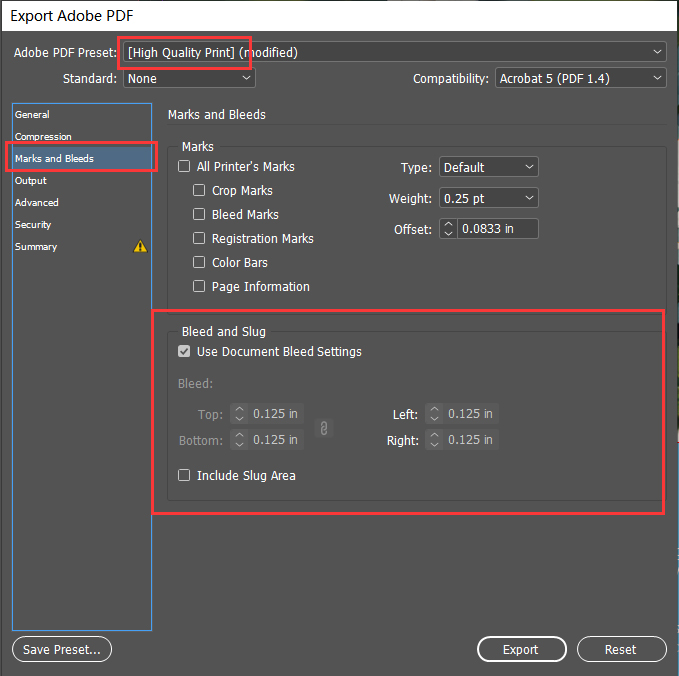
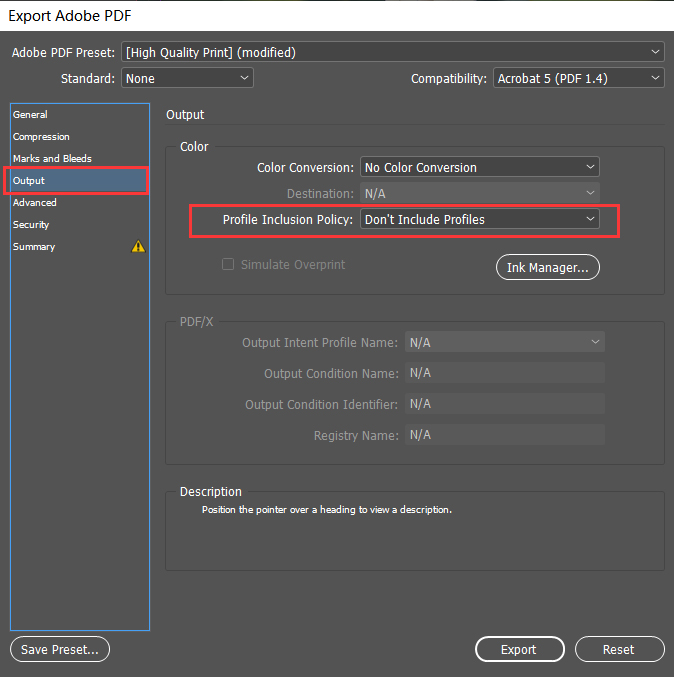
5. Once your design is complete, click on “Save” and choose the file type as “Adobe PDF”. In the popup window, select “High Quality Print” and check the option “Use Document Bleed Settings” under “Marks and Bleeds”. In the “Output” options, choose “Don’t Include Profile.”
6. Open the saved PDF file and ensure that the size includes the bleed area.
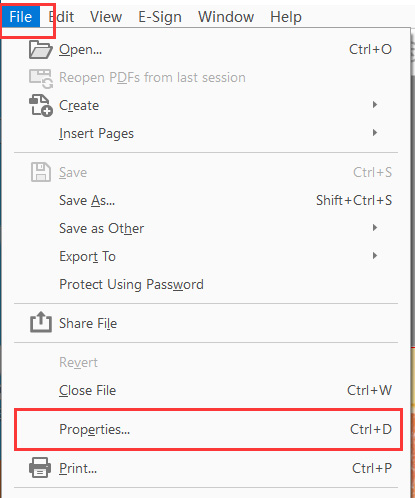
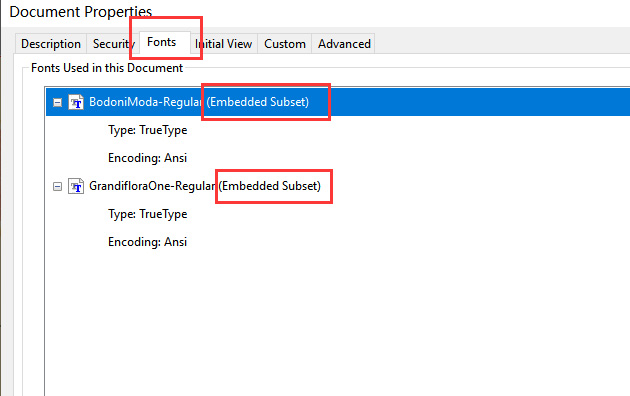
7. Click on “File” – “Properties”, check the fonts, and ensure all fonts have the “Embedded Subset” flag.
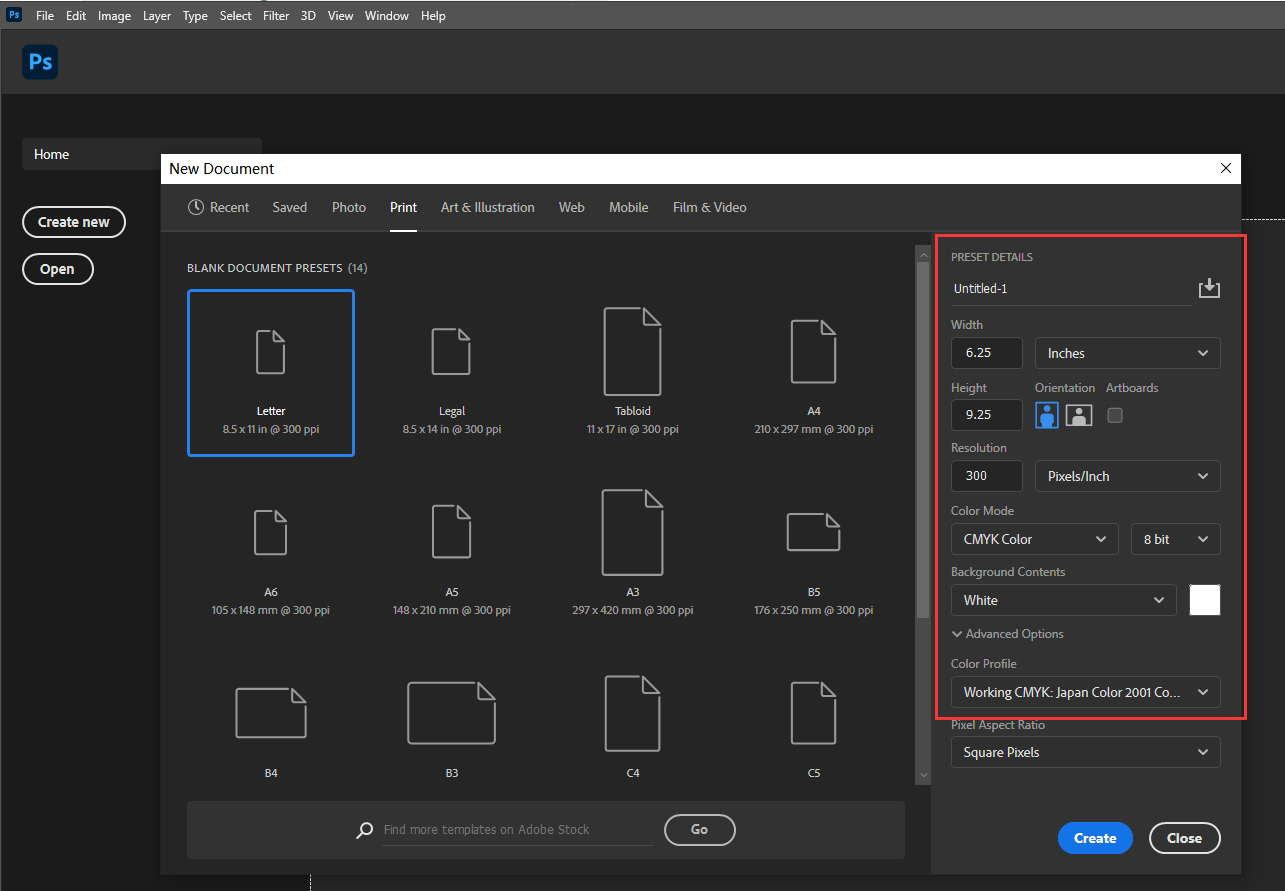
1. Open Adobe Photoshop and click on “Create New”. Enter the dimensions including bleed; for instance, if your design is 6×9 inches, input 6.25×9.25 inches (adding 0.125 inches / 3mm bleed on each side).
2. Set the resolution to 300, choose CMYK colour mode, and in the Advanced options, select the Japan Color 2001 Coated colour profile. Then, click “Create”.
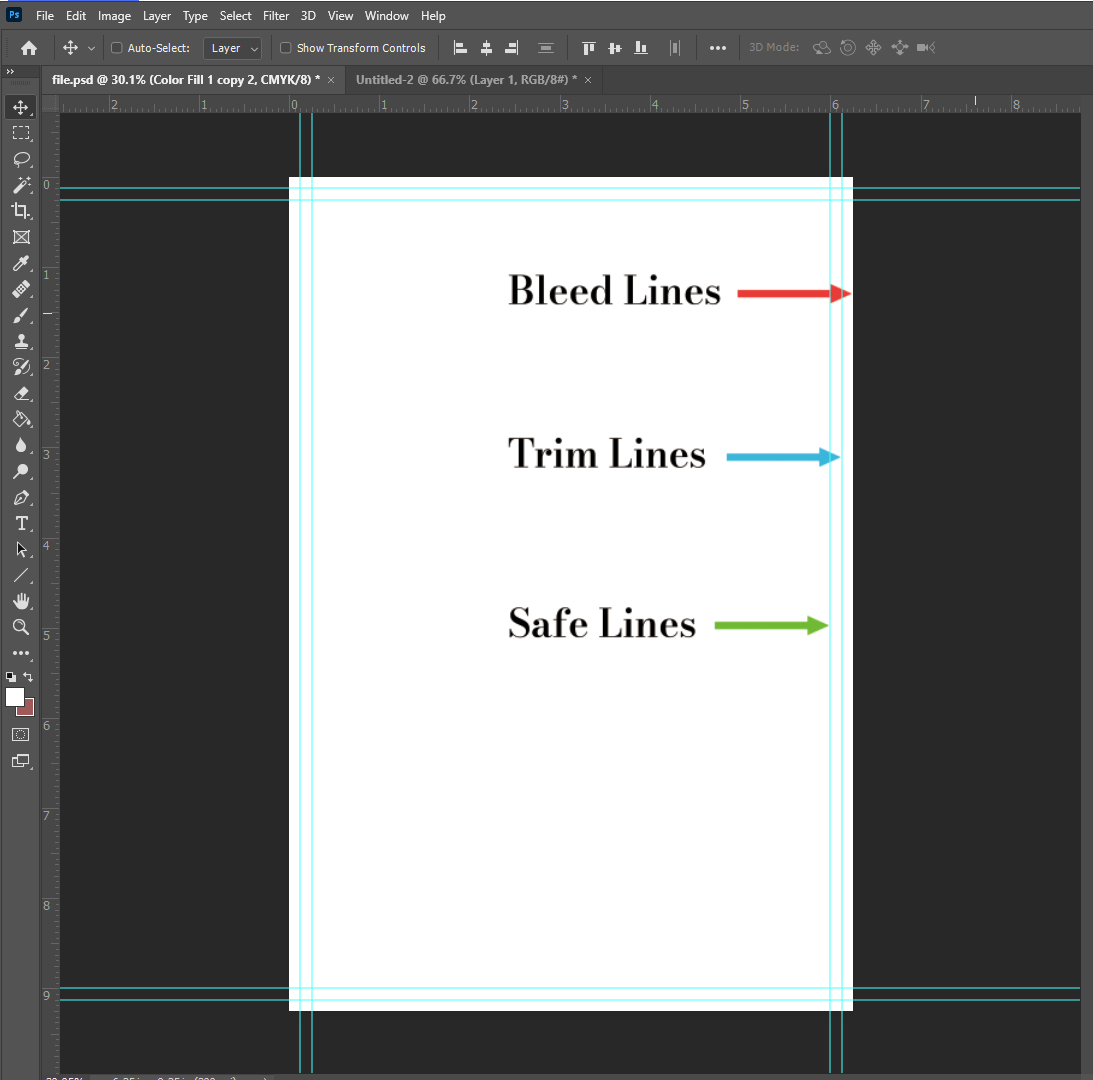
3. In the new document, the entire white area includes the bleed, while your actual product size is 6×9 inches in the center.
4. We recommend using guidelines to mark the trim lines. The safe area should be at least 0.125 inches or 3mm away from the trim lines, and it’s also recommended to mark it with guidelines.
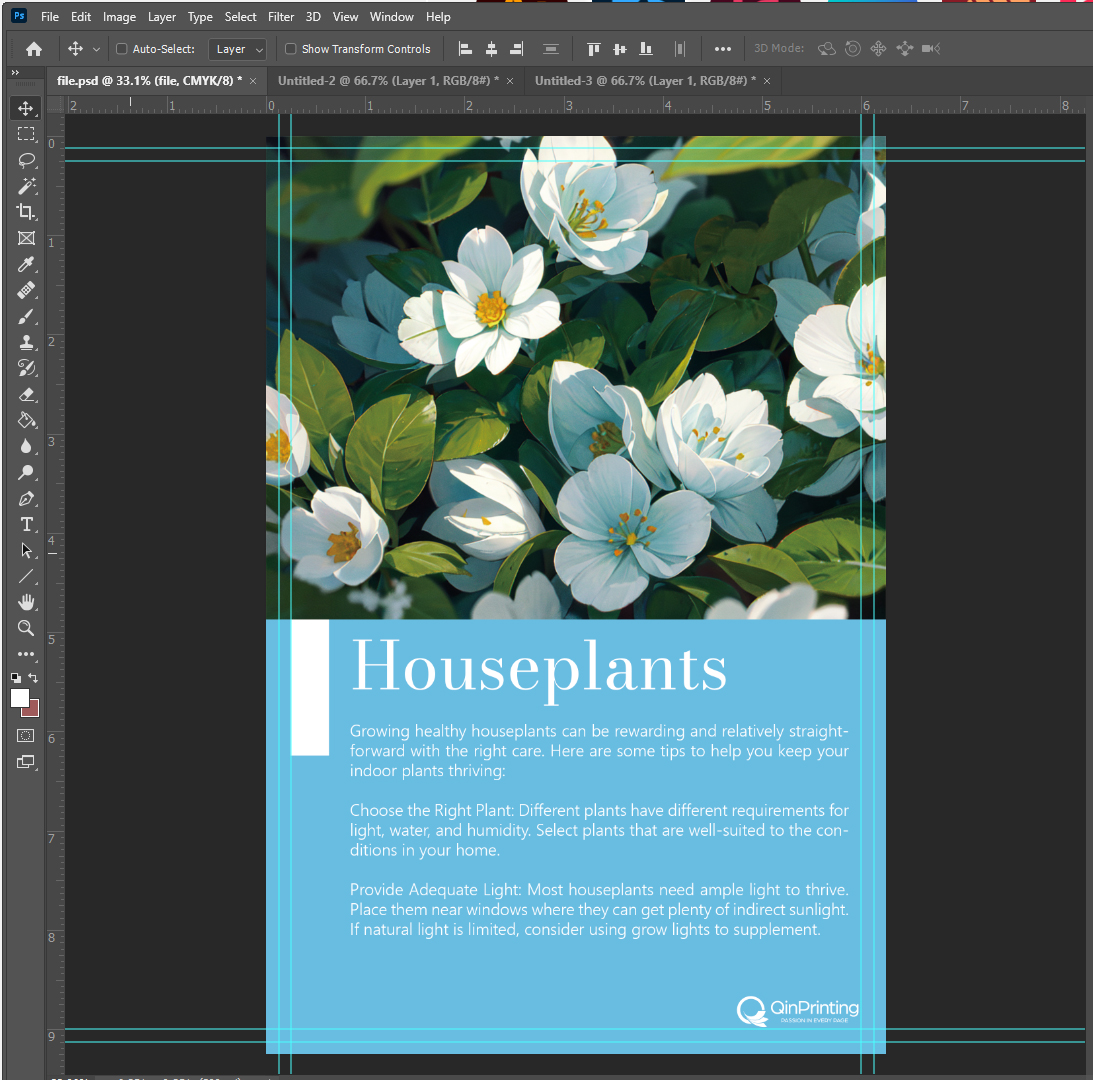
5. Begin designing, ensuring that all images you use are in CMYK mode and have a resolution of 300 dpi. Extend the background to the bleed area and ensure important content and text are at least 0.125 inches (3mm) away from the trim lines.
6. Once your design is complete, choose “Save” and select the save type as Photoshop PDF. In the popup window, choose “High Quality Print”, and in the output options, select “Don’t Include Profile”.
7. Open the saved PDF and ensure the size includes bleed. Click on “File” – “Properties”, check the fonts, and ensure all fonts have the “Embedded Subset” flag.
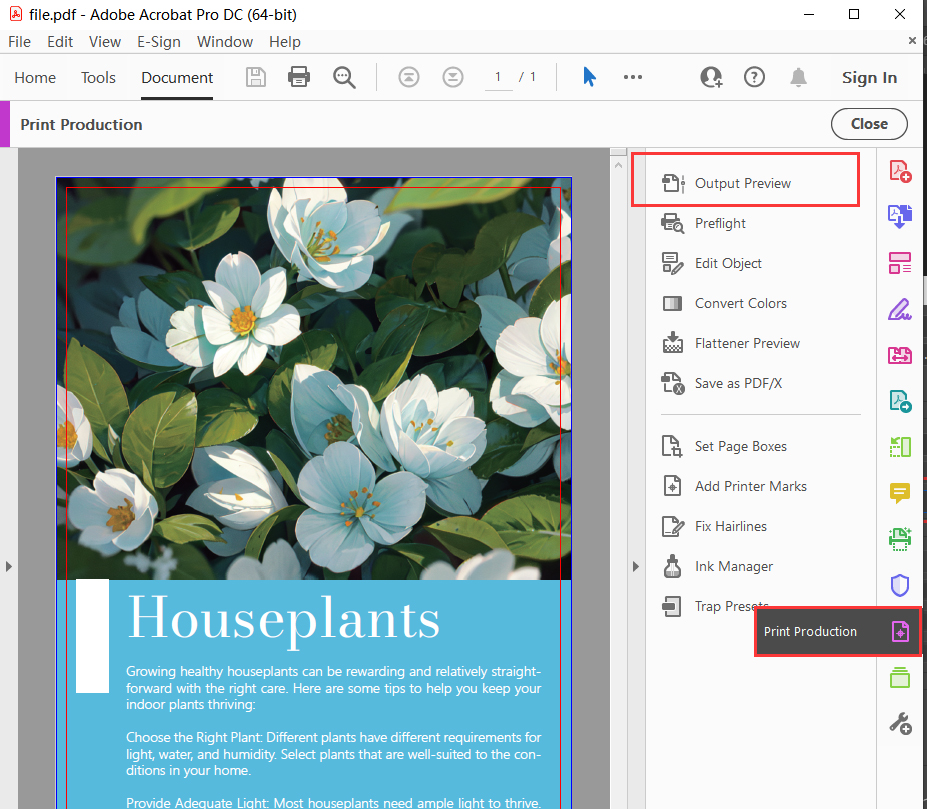
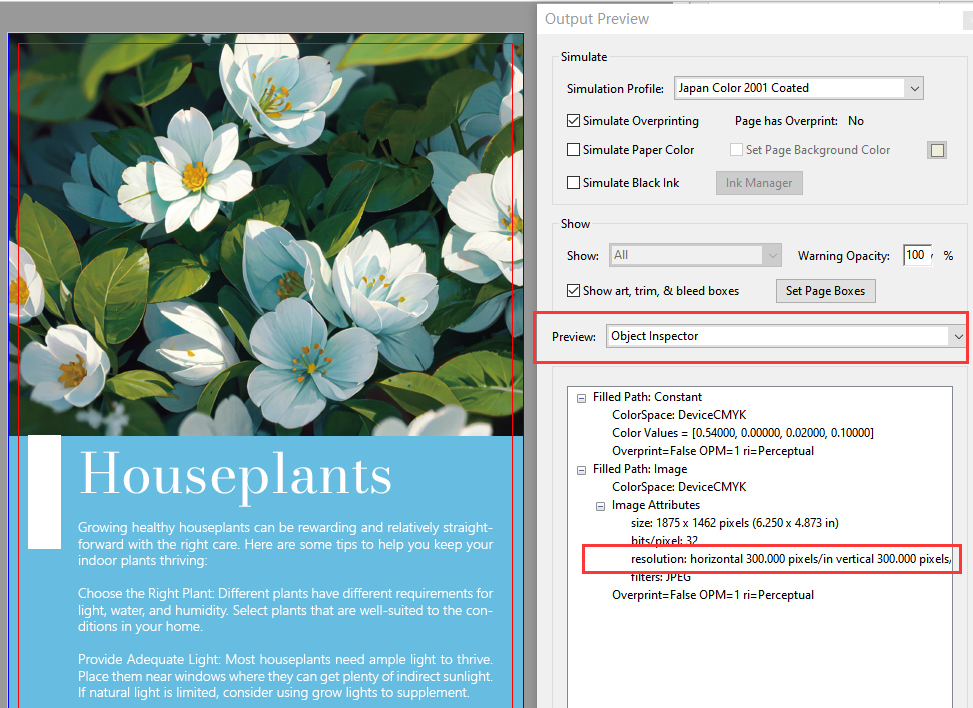
8. To check the resolution of the image, click “Print Production” – “Output Preview”. Under “Preview”, select “Object Inspector”. Click on the image in the document to view its resolution.
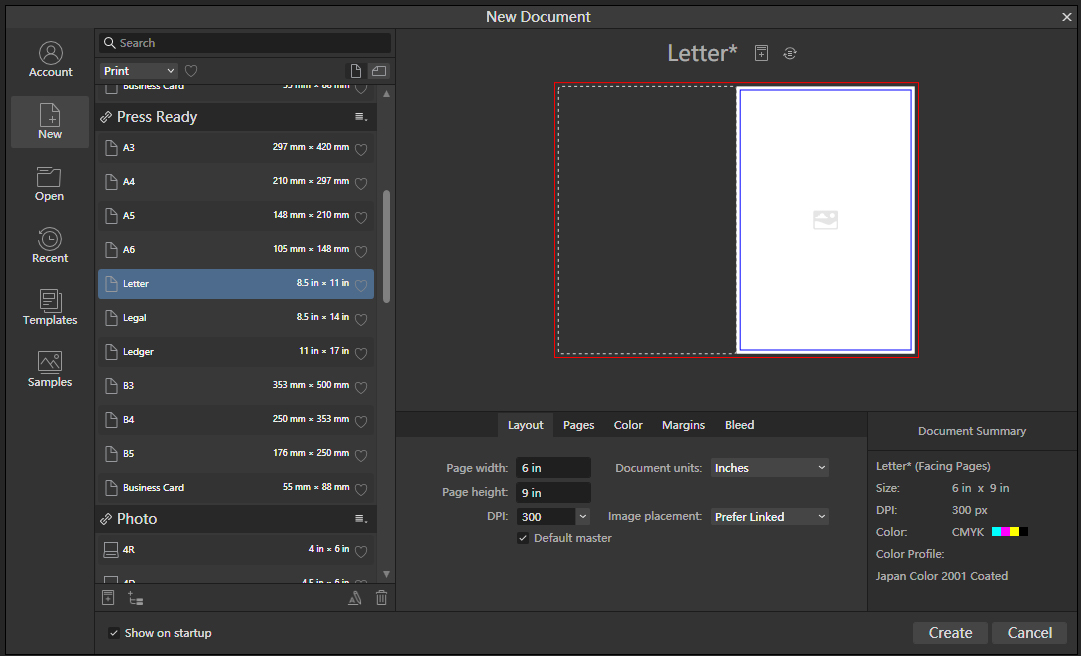
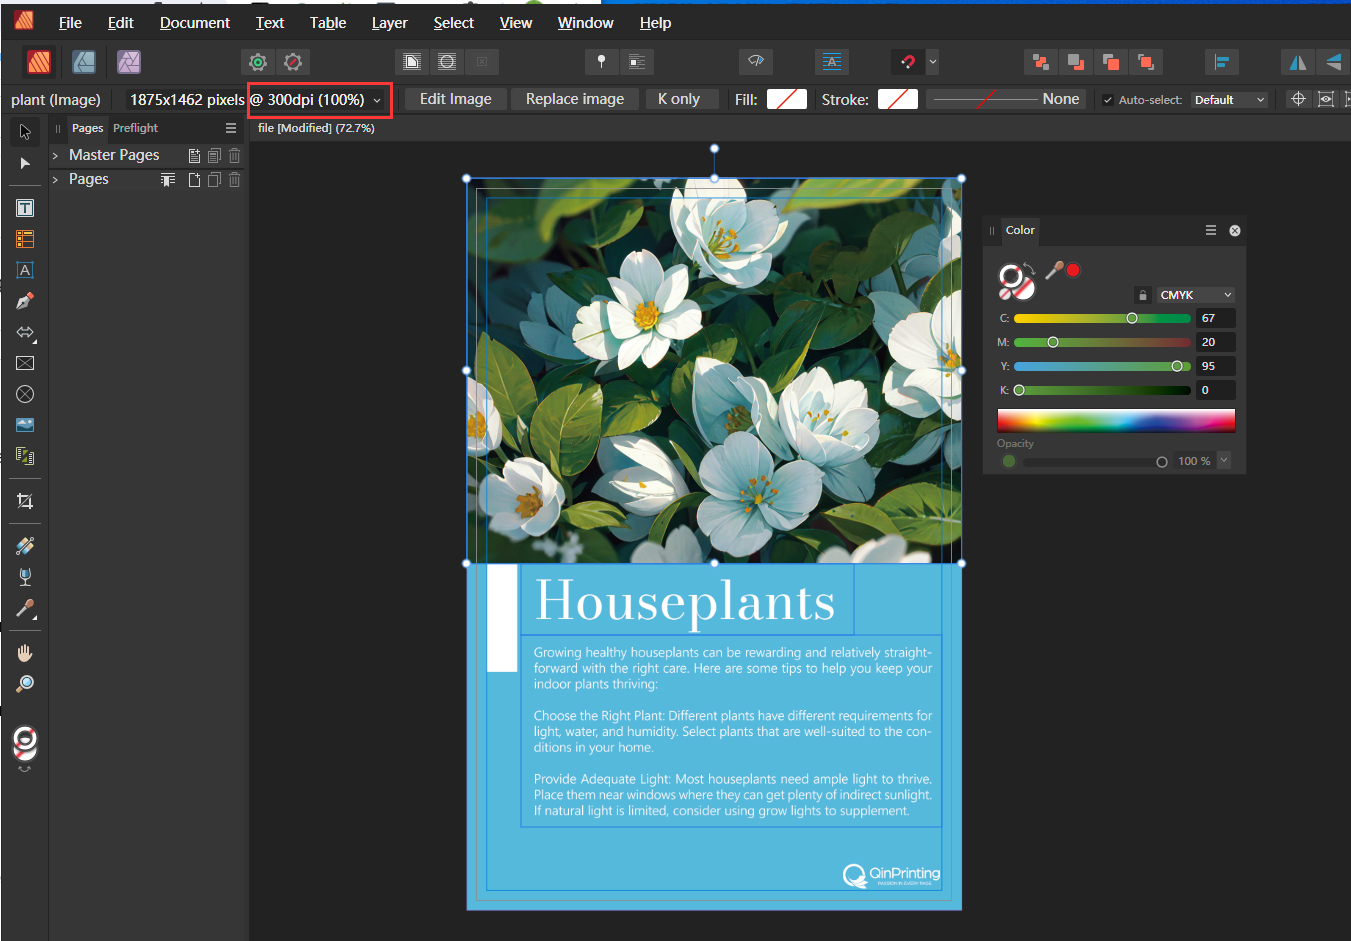
1. Open Affinity Publisher and navigate to “File” – “New.” In the layout panel, input the desired finished size and choose the correct units. Set DPI to 300. In the Color panel, select CMYK and “Japan Color 2001 Coated”.
2. In the margin panel, input at least 0.125 inches or 3mm. In the bleed panel, input 0.125 inches or 3mm.
3. In the new document, the white area represents the finished part, while the purple lines indicate bleed lines, and the blue lines denote safety lines.
4. When adjusting colours, ensure to use CMYK. Verify that your images are in CMYK mode and have a resolution of 300 dpi.
5. Extend the background to the bleed lines and ensure important content and text are within the blue lines.
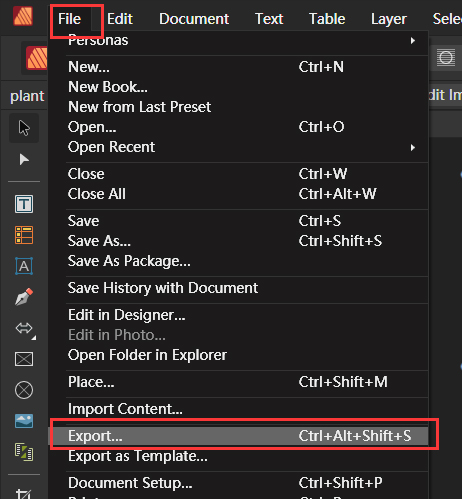
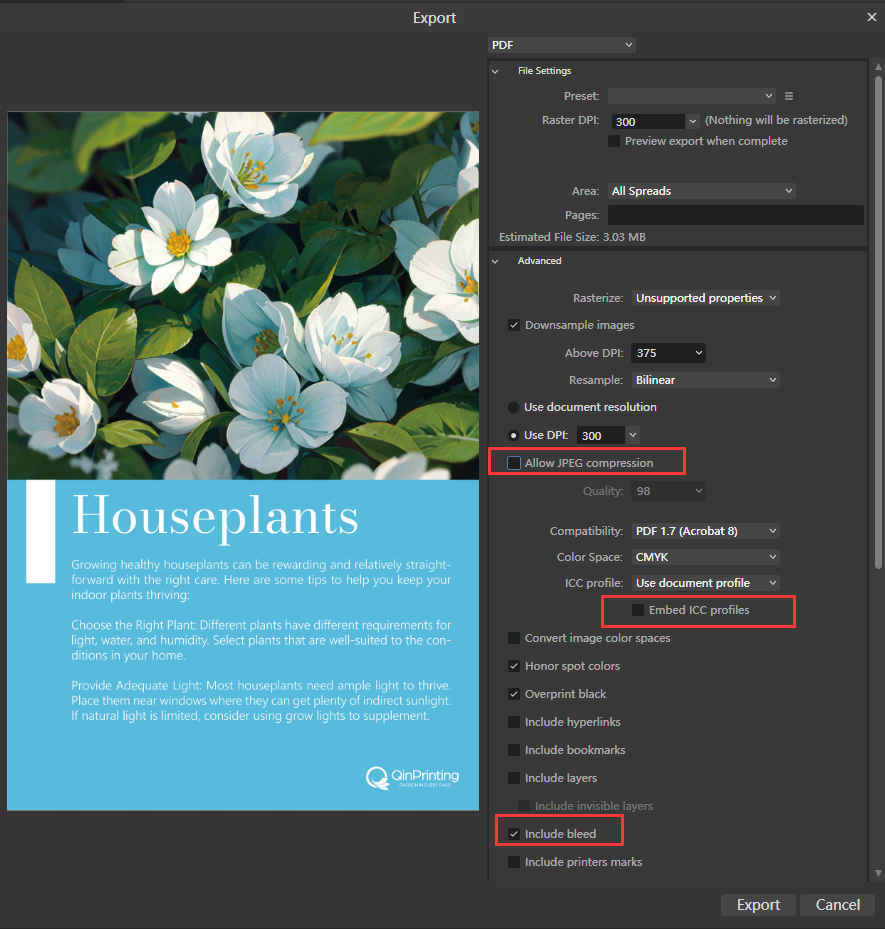
6. After completing the design, select “Export” and choose the save type as PDF.
7. Select “PDF (Press Ready)” and do not check “Embed ICC Profile.”
Open the saved PDF to confirm it includes bleeds. Click on “File” – “Properties” and check the fonts to ensure all have the “Embedded Subset” flag.
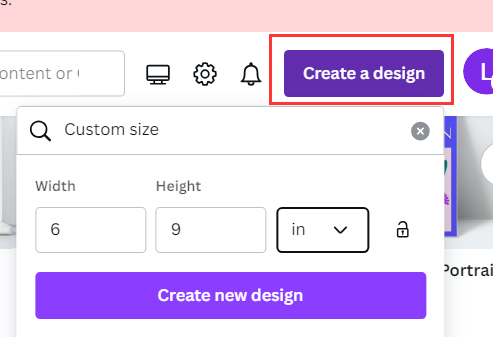
1. Open Canva and click on “Create a Design”. Enter the desired finished size and choose the correct units.
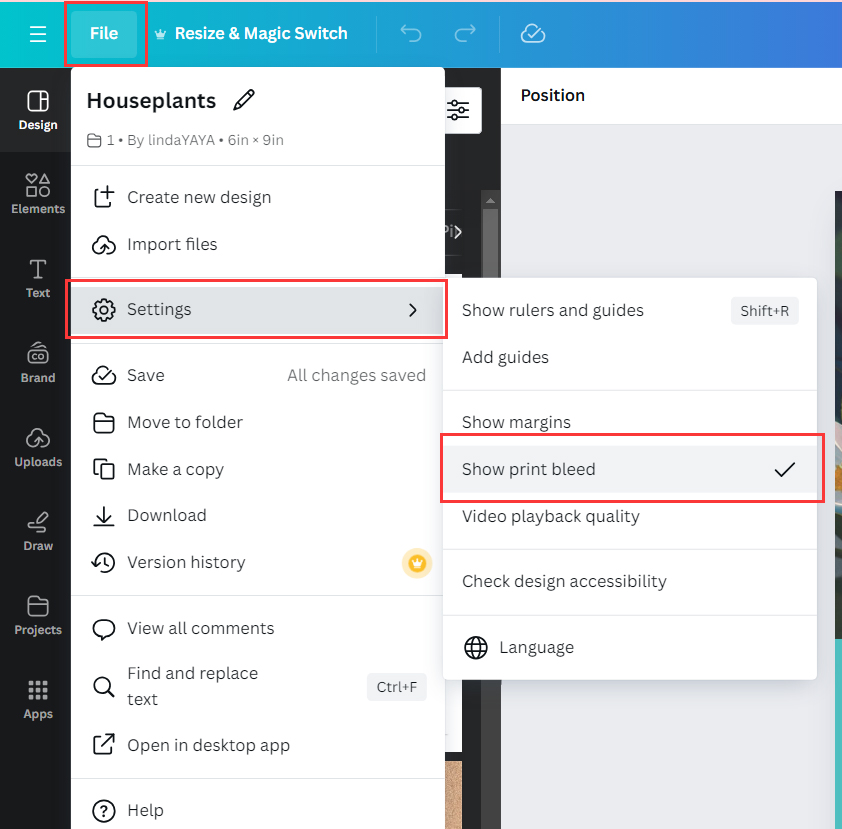
2. In “File-Settings”, check “Show Print Bleed”.
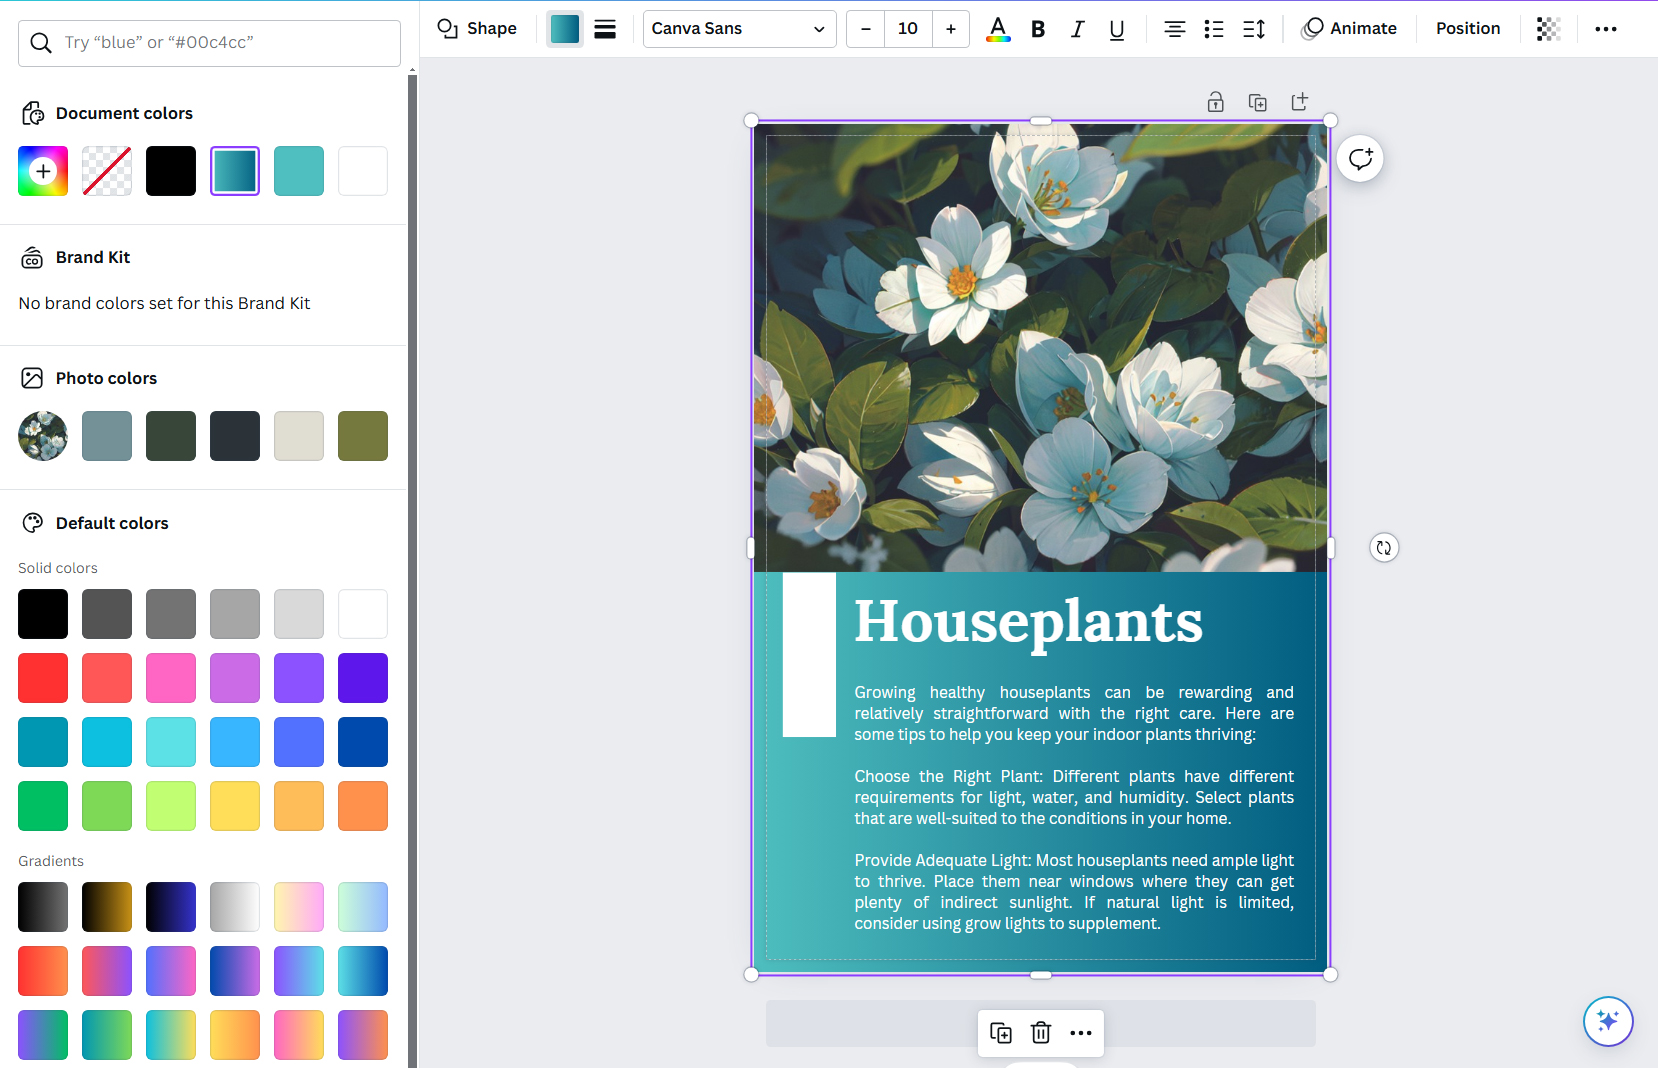
3. Start designing. When editing colours, use CMYK colour hex codes. Make sure all images you use are in CMYK mode and have a resolution of 300 dpi. Extend the background to the bleed area and ensure important content and text are at least 0.125 inches or 3mm away from the trim lines.
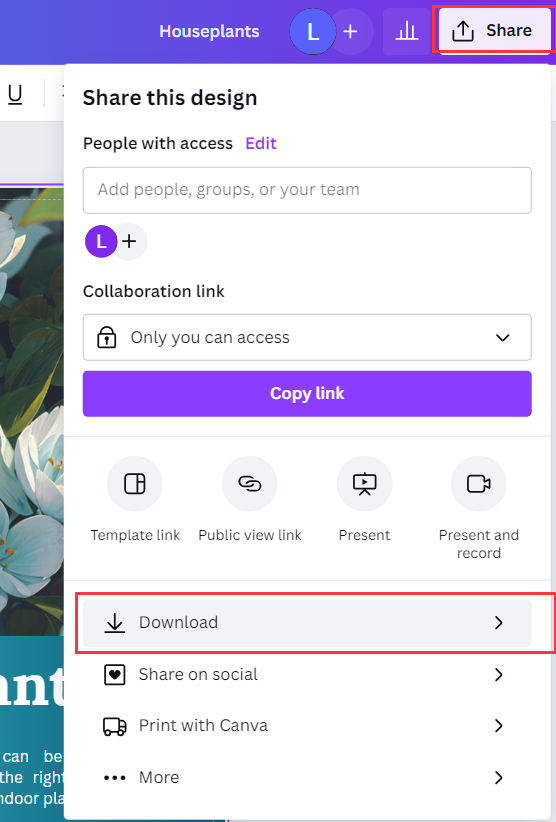
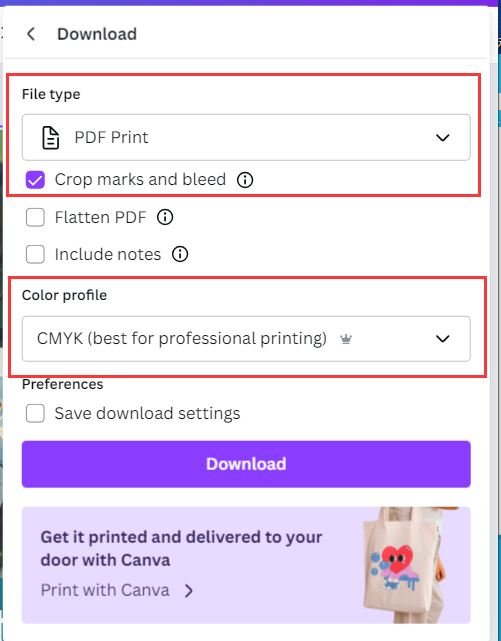
4. After completing the design, select “Share” and then “Download”. Choose the save type as “PDF Print”. Check “Crop Marks and Bleed” and select CMYK as the colour profile. Click on “Download”.
5. Open the downloaded PDF and ensure the size includes bleed. Click on “File-Properties”, check the fonts, and ensure all fonts have the “Embedded Subset” flag.
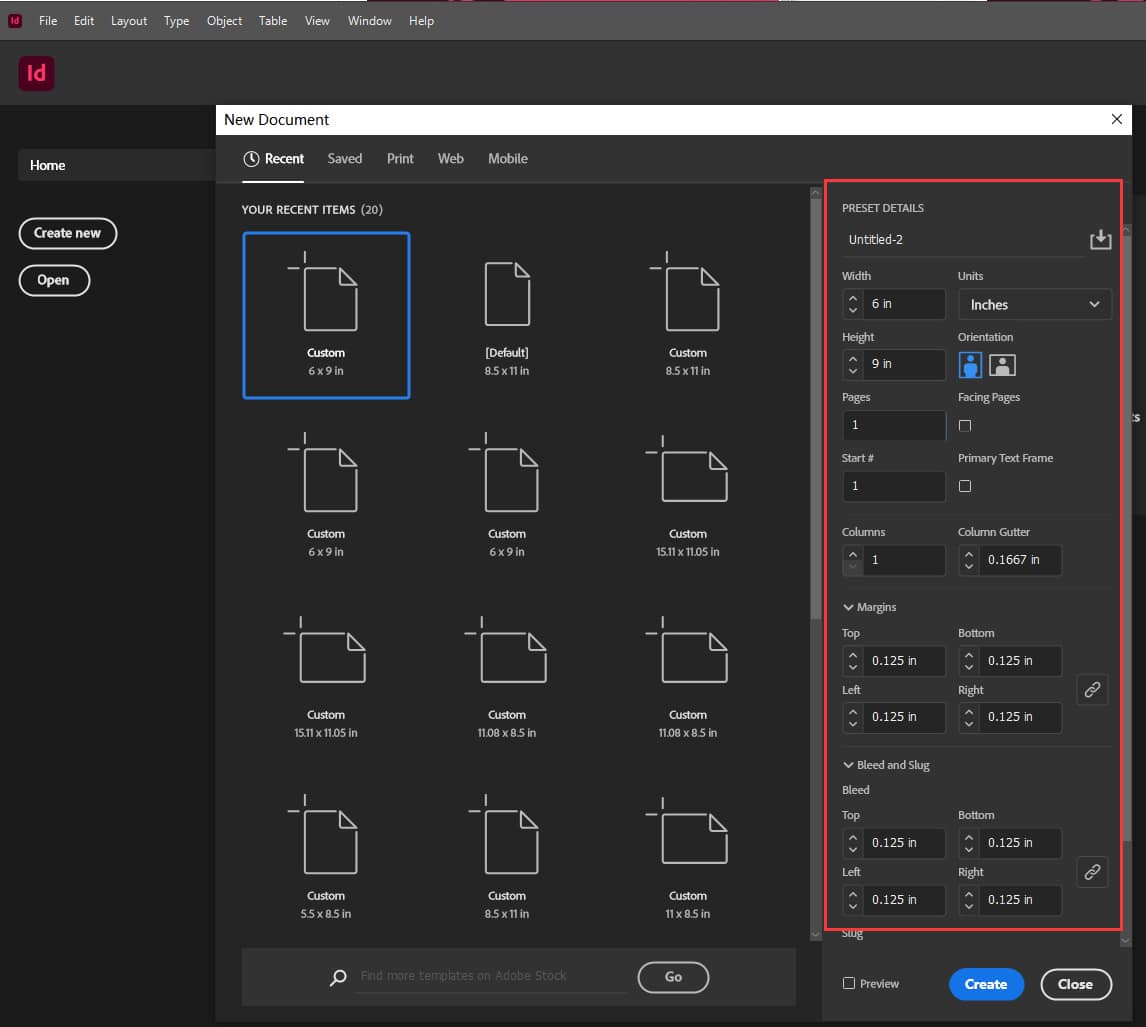
1. Open Adobe InDesign and click on “Create New”. Input the desired finished size and choose the correct units.
2. Set margins and bleeds to at least 0.125 inches or 3mm.
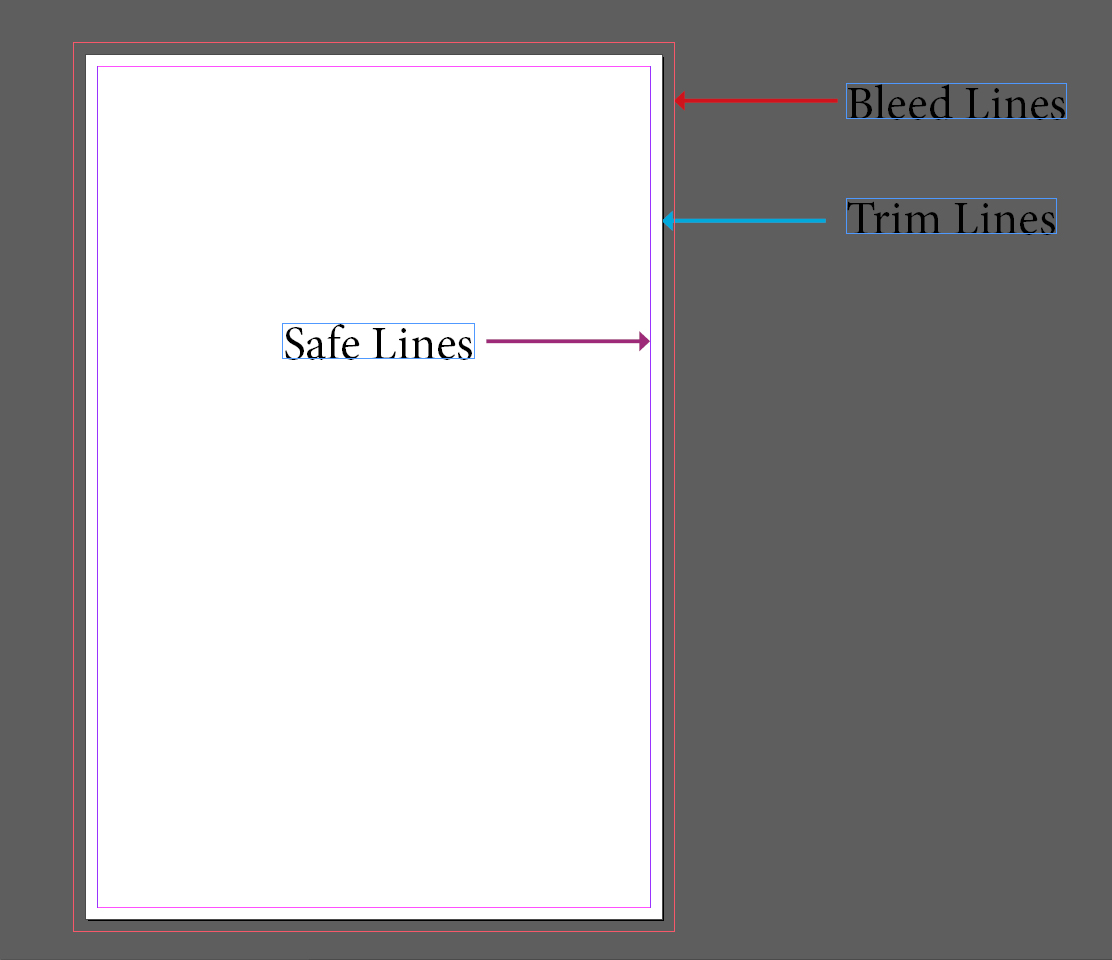
3. In the new document, you’ll see the white area as the finished part, the red lines as the bleed lines, and the purple lines representing the safety zone.
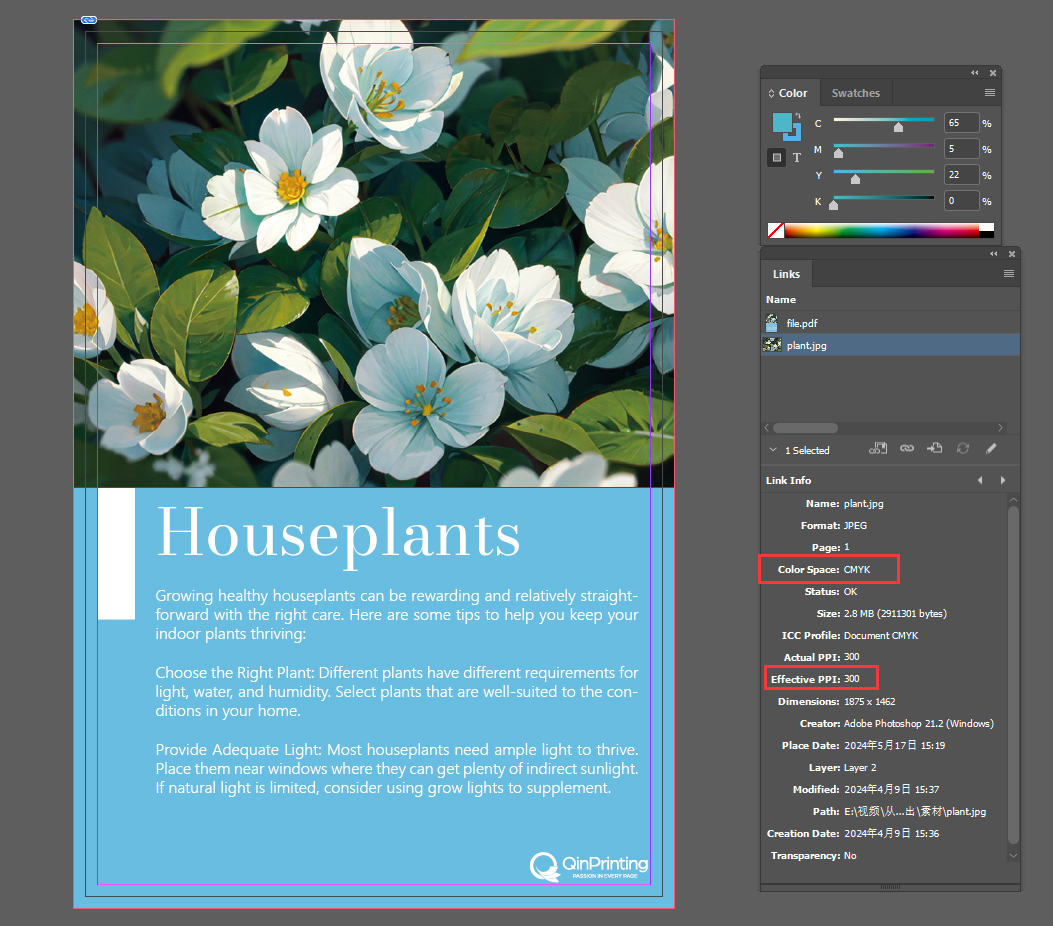
4. When editing colours, use CMYK. Ensure your images are in CMYK mode and have a resolution of 300 dpi. You can verify this information in the Links panel. Extend the background to the bleed lines and ensure important content and text are within the purple safety zone.
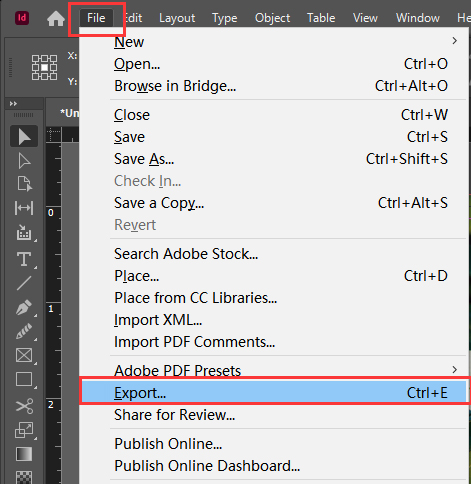
5. After completing the design, select “Export”, and choose the file type as “Adobe PDF”. In the export window, select “High Quality Print”. Under “Marks and Bleeds”, check “Use Document Bleed Settings”. In the “Output” section, select “Don’t Include Profile”.
6. Open the saved PDF to confirm it includes bleeds. Click on “File” – “Properties” and check the fonts to ensure all have the “Embedded Subset” flag.
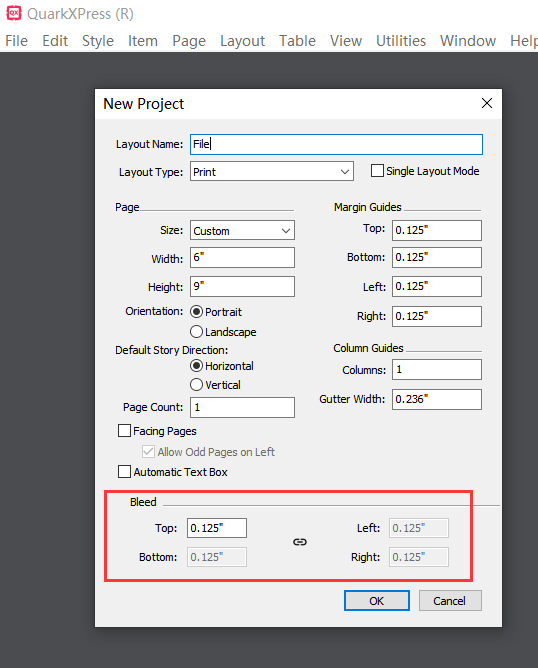
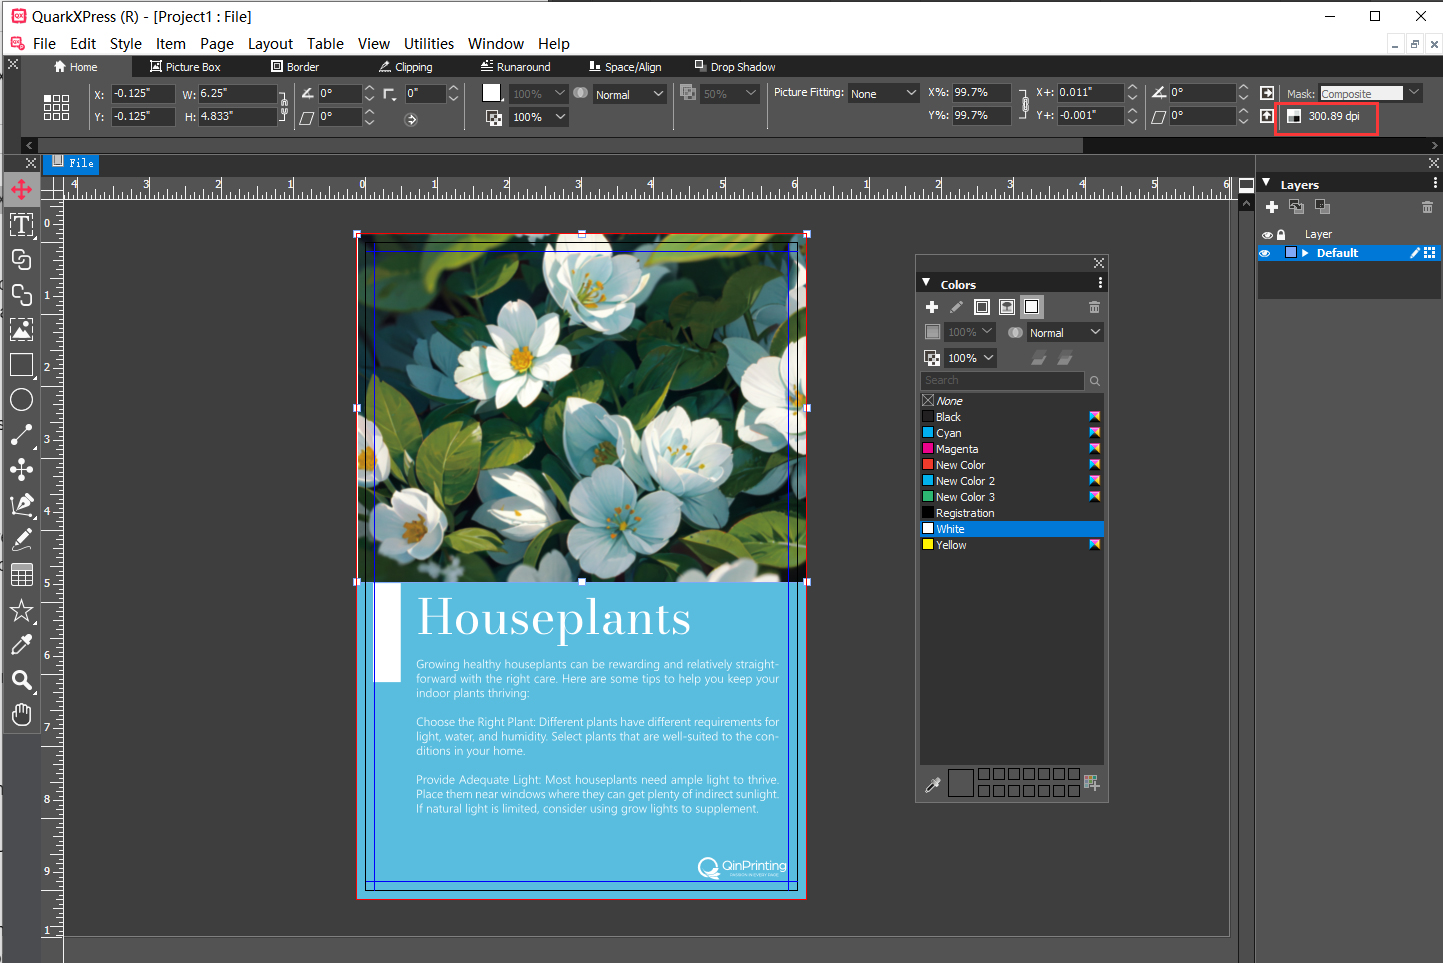
1. Open QuarkXPress and click on “File” – “New Project”. Enter the desired finished size. Input at least 0.125 inches or 3 mm for the margins, and 0.125 inches or 3 mm for the bleed.
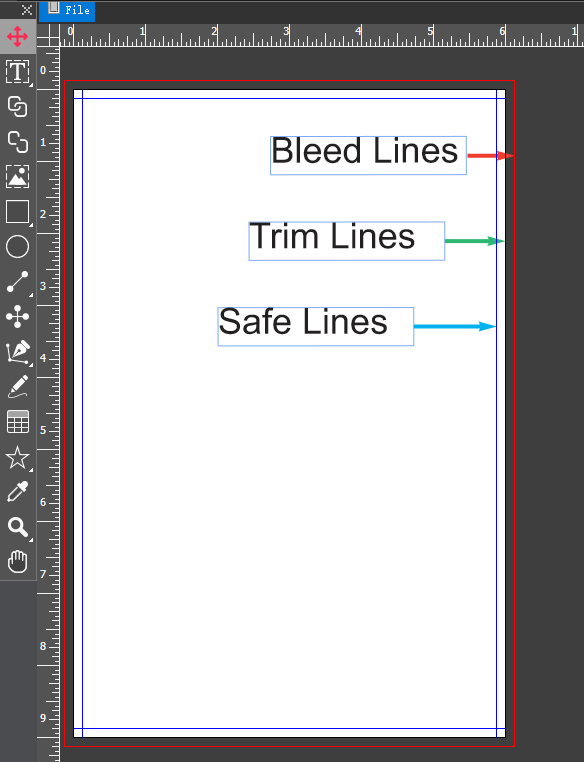
2. In the new page, the white area represents the finished part, the red lines indicate the bleed, and the blue lines represent the safe area.
3. When editing colours, use CMYK colour mode. Ensure that all images are in CMYK mode and have a resolution of 300 dpi. You can check the current effective image resolution in the picture box panel.
4. Extend the background to the bleed area and ensure that important content and text are within the safe area.
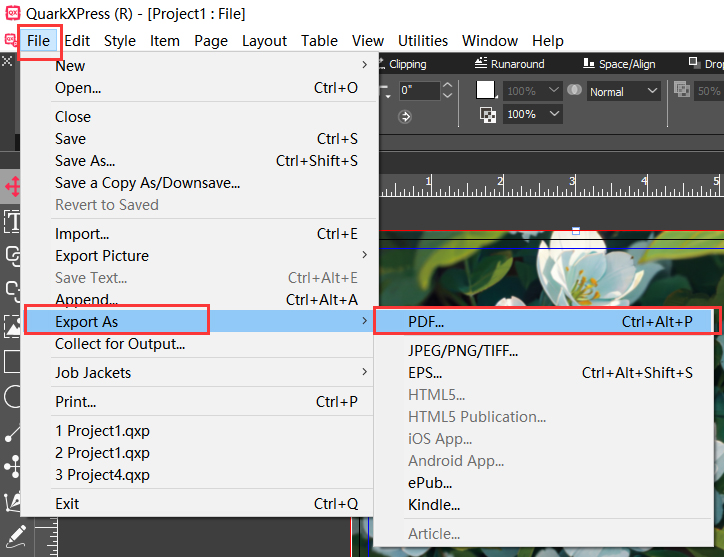
5. After completing your design, select “Export as” and choose PDF. In the popup window, click on “Options”.
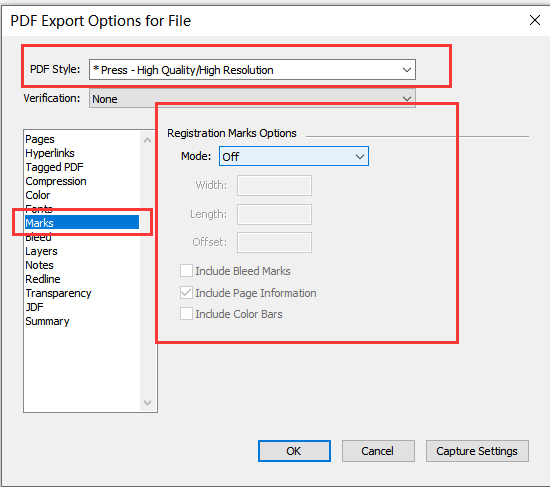
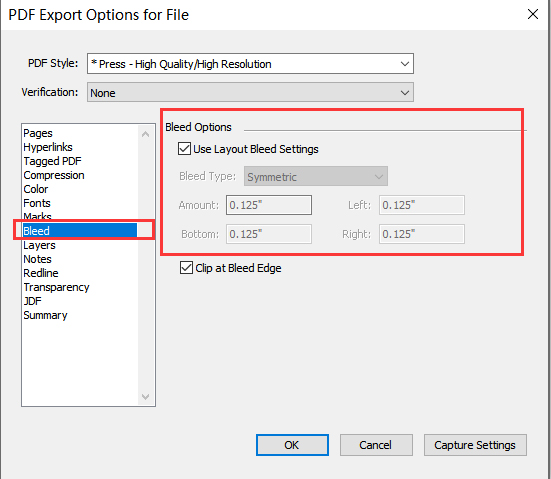
6. In the options panel, select “Press – High Quality/High Resolution”. Under “Marks”, choose “Mode – Off”. Under “Bleed”, select “Use Layout Bleed Setting”.
7. Open the saved PDF file and ensure that the size includes the bleed area. Click on “File” – “Properties” to check the fonts, and ensure that all fonts have the “Embedded Subset” flag.
Which Software Is Best for Print Design?
Every designer working with text and images to create files ready for offset printing will have their personal favourites. The decision may be based on what they’re used to using, the designs they’re working on, and the print technology that will be used to print the finished product. At QinPrinting, we combine our technical expertise with over 25 years of success in the offset printing industry to bring you our picks of the best design software to use when doing prepress artwork for offset.
Software for Book Cover Design
When it comes to cover designs—whether for a paperback, a hardcover book, a catalogue, or anything else—the standout software is undoubtedly Adobe Illustrator (AI).
Adobe Illustrator
We love Illustrator. Why? Besides the relatively intuitive user interface and helpful support files, this is pro-level software which creates images using vectors. The great advantage of vectors in offset printing is that the images can be resized and manipulated with no loss of resolution or accuracy. This makes it super easy to work with and you can export the images directly as vectors in your print-ready files. It’s also great on the technical side. So, for example, with Illustrator, it’s straightforward to set up your bleeds, trim lines, and safe zones. If there’s a downside, vectors aren’t always ideal for working with photographs and for that, you may prefer Adobe Photoshop, which we’ll look at next.
Photoshop
Photoshop is widely recognized as the go-to software for professional photographic manipulation and design work. It works with raster images based on pixels rather than vectors. If you use Photoshop for your images, make sure that you export them with a resolution of at least 300 dpi for offset printing. While you can create vectors in the latest versions of Photoshop, it’s not good for editing them. Also, it’s as good as useless for text. So, for most cover design, it’s not ideal. And you can’t set up the bleed in Photoshop. Of course, you can manipulate your photo in Photoshop and then import it into Illustrator to complete and export the final design.
Software for Interior Design
As we recommend Illustrator for cover design—and you can also use it for the inside pages—when it comes to designing the interior layout of your book, the standout software is undoubtedly Adobe InDesign (ID).

Adobe InDesign
InDesign is a powerful and intuitive software which we find ideal for creating interior page layouts along with images, graphics, and the technical specifications needed to prepare documents for offset printing. It integrates seamlessly with both Illustrator and Photoshop and makes importing vector and raster graphics from either of these a breeze. You can buy a subscription to the complete Adobe suite, which includes Illustrator and Photoshop, for the perfect do-anything design combination, or select just InDesign or combine it with any other application as per your needs and budget. The only common complaint about InDesign is that files from older versions don’t always work in later iterations. So, we’d recommend always making sure you have the latest edition and keep it updated.

QuarkXPress
QuarkXPress is an excellent solution for the newbie designer and the professional alike. It integrates graphics, image, and photo manipulation capabilities with text, typography, and layout features. For the complete beginner, you’ll find a handy “drag-and-drop” user interface which means anyone can get started with design right away. It’s proved especially useful for larger organizations working on projects to scale with several different editors and designers involved in an ongoing collaborative workflow. There’s really only one downside to QuarkXPress from our point of view—and yours if you’re preparing files for offset printing—but it’s a big one. It doesn’t integrate at all with any other software. So, importing and exporting files with and from, say, Illustrator, InDesign, and Photoshop is a no-go. As you can imagine, that can lead to a fairly restrictive environment when you’re preparing work for offset.

Affinity Publisher
Affinity Publisher is the latest iteration of the now defunct PagePlus/Serif applications. It’s a good, functional design software which should be within the budget of almost anyone, including first time self-publishers and independent creatives. On the positive side, it can do a lot of work and produce neat book, brochure, flyer, and poster layouts. It also has in-built master templates for the most common print projects and integrates well with a wide range of other software. The downsides are that the interface is far from intuitive and the menu and operational design are dissimilar to more familiar user interfaces. So, it can be a frustrating and rather a steep learning curve. That said, it has a reputation for fairly comprehensive and reliable customer support which may counter balance those difficulties to some degree.
Need More Help? Talk to Us!
At QinPrinting, we pride ourselves on our first-class customer service. If you have any further questions about which design software would be best for your needs, we’ve made it super-easy for you to get in touch with our expert design team by telephone, via email, Skype, the chat box, or the contact form. Talk to us!

