Prepress Artwork
A quick, easy-to-understand introduction to everything you need to know to prepare your artwork and layouts for offset printing.

What Is Prepress Artwork and Why Does it Matter?
“Prepress” is the industry term for everything you do to prepare your artwork and layouts to deliver files that are ready for offset printing. It’s vital to follow the printer’s guidelines and get all the specifications right to that your products print perfectly. So, for example, you’ll need to make sure that your files are prepared and exported in the correct format, that your images have a high enough resolution, you’ve set up the appropriate color space, everything is properly sized, and more.
At QinPrinting, we take great pride in our superb customer service and our close attention to detail. We want every customer to get the exact results they hoped for, or better. So, our team of experts will always manually check all your files for you before we go to print. If we find any errors or other issues, we’ll let you know immediately, explain what the problems are, and help you fix them. But to make things even easier from the outset, we’ve put together this guide to what you need to know to complete your prepress work as smoothly and successfully as possible, to get a perfect print every time.
Your Helpful Guide to Prepress Artwork
Not all design software is created equal. We recommend the Adobe Suite, especially InDesign and Illustrator. InDesign is ideal for creating print files for books, magazines, catalogs, posters, flyers and more. Illustrator is our software of choice for other print products such as paper boxes, board games, and playing cards. For image-only projects, we can also work with files generated in Photoshop. QuarkXpress is another option which can be useful for largescale projects with heavy editing workflows.
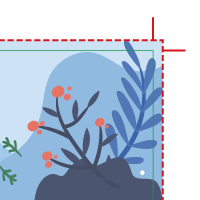
During processing, slight variations may occur in printing. To allow for this, you need a “margin of error”. The “bleed zone” is the technique we use to give a degree of tolerance, so that when we cut and trim your printed pages, the results are neat and exactly as you wanted them. The bleed zone is indicated by a red dotted line in the print file. Your artwork should extend beyond the trim line (a green dotted line) to the limits of the bleed zone.
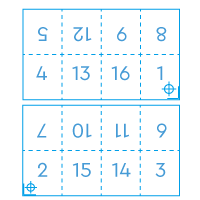
We print several pages on larger sheets, so that when the pages are cut, folded, and glued or sewn together for binding, they will be in the right order. These sheets are called “signatures”. Each signature will have pages in multiples of 4 (one sheet with a single fold makes four pages). The most common signatures, however, have 8, 16, or 32 pages depending on the size of your book. If your book has an odd number of pages not divisible by four, then you’ll need to add one or more pages to make up the signatures.
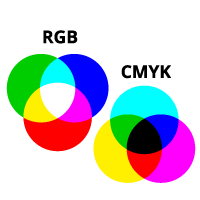
When you’re designing your artwork and layouts on the computer, the default color space is usually RGB (Red-Green-Blue). That’s fine for screen image at 72 dpi resolution, but won’t look right once it’s been printed. Offset printing uses the CMYK (Cyan-Magenta-Yellow-Black) color space. So, you’ll need to convert your colors to the CMYK mode to export.
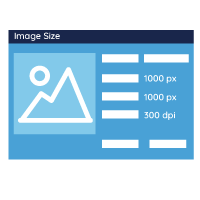
When exporting images for printing, you’ll need to make sure that they have a resolution of at least 300 dpi so that the results are crisp, sharp, accurate, and clear. On-screen images resolve at 72 dpi, which looks fine on your laptop but would be blurred, cloudy, or “pixilated” on the printed page.

We much prefer to receive vector graphics for artwork as the precision and tolerance even after resizing is so much better than with raster graphics. Adobe Illustrator and CorelDraw are both excellent software for working with vectors and we recommend them. So, if you can create your images and export them as vectors, you’ll make your printer very happy and also get a vastly superior result on the page.
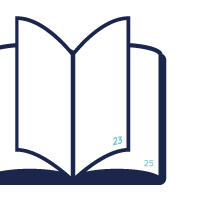
While not all books need have numbered pages, the positioning and style of the numbers is a design choice and most software allows you to set up pagination in a few clicks. Check that you’ve numbered the pages correctly and that the position and style is consistent throughout.

A book’s spine is the outer area of the cover forming a strip between the front and back. The spine’s size is decided by the number of pages, paper thickness, and binding style. So, the spine of a paperback book is equal to the sum of the pages and the covers, a hardback spine must also account for the casing, and a saddle stitched book doesn’t have a spine at all. Remember to include relevant information on the spine, such as the title, author’s name, publisher, and logo.
Which Formats to Use for Your Artwork
Our preferred formats for artwork for printing are PDF (Portable Document Format) and AI (Adobe Illustrator) files. We’re also happy to work with Idml (InDesign) and PSD (Photoshop) formats.
We strongly recommend you not to send us docx (Microsoft Word) or xlsx (Microsoft Excel) files as they will undergo too many changes during processing to guarantee and accurate, professional-quality result. They’re intended for office use, not offset printing.

Prepress Artwork Checklist
That may seem like a lot of information to take in if you’re not already familiar with preparing files for printing. So, here’s a helpful “at-a-glance” checklist of the most important points to remember:
- If your document includes photographs and full-color images, have you set up the bleed correctly?
- Have you made sure to embed all fonts?
- If not using vectors, are your images resolved to at least 300 dpi?
- Have you exported in the CMYK color space?
- Have you allowed a safe zone of at least 3 mm between the important text, images, and page numbers or footnotes and the trim (cut) lines?
We're Here to Help!
If there’s anything you don’t understand or need help with, talk to us. Our experts in the prepress department will be happy to help you. And by all means send us your files when you’ve done what you can so that we can check them for you. If we find any errors or issues, we’ll let you know and help you resolve them. We want you to have a great experience working with us and—most importantly—to get the best possible results. You’re welcome!

